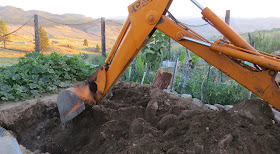
This post tells the tale of the "Central Horizontal Spruce Bed,"
from August 2013 to April 2014.
"Before" (August 2013)
The making of a pit
Wood Layer 1:
All of the wood in this bed was laid horizontally, and I'll be comparing the results with other beds in which the wood was placed vertically. When I built this bed, I hadn't yet heard about the potential benefits of vertically placed wood. It makes sense to place it vertically, though, since water flows vertically through the tree when it is alive and you can imagine plant roots digging into the wood more easily into a cross section.
I placed lots of leaves, garden trimmings, etc between the layers of wood.
(I call this the "central" horizontal spruce bed because it is located very roughly in the center of the garden.)
Water is important between every layer that is added.
More horizontal wood, mostly spruce
Wood Layer 2 complete:
I like to mix the diameter size in order to have smaller pieces that break down -- and therefore function -- quicker, along with bigger pieces that might last longer. Same goes for mixing green with dead and rotten wood, when possible.
What do I mean by "function?" This refers to the three main benefits of rotting wood in the garden: water retention, the heat of decomposition, and self-tilling via creation of air pockets when the wood breaks down.
More leaves, greens, and water
Wood Layer 3:
Longer pieces of spruce, also horizontal
The cherry on top: a dump trailer of aged manure and top soil, mixed

Fast forward to October: time to plant garlic into part of the central horizontal spruce bed. I laid cardboard out, then cut X's in it for planting.
The planting X's are opened and the garlic seed planted, ready for mulch.
Fast forward several months to April 2014: the garlic is up! Spanish Rojo, Romanian, and Elephant garlic, one row each. Because of the cardboard and leaf mulch, there will be no weeding needed in this bed. I am not planning to irrigate it much, either.
I'll post an update on this bed again, once there is more growing across the whole space. This is such an exciting time of year!


Okay, I must have missed something somewhere about the vertical logs as opposed to horizontal. Hmm. Always something else to think about! Can't wait to see how your garlic bed does!
ReplyDeleteJacki, thanks for your interest! It's a fascinating theory about utilizing the direction of the vascular tissues in the wood for making moisture accessible to the garden plants' roots. If you picture the tubular structures of the xylem and phloem running lengthwise through the trees, it makes sense that the roots of your plants might more easily access water by growing into those structures, which are opened into cross sections when the logs are cut to length (like straws within the logs). Compare that with plant roots meeting the smooth natural edge of a log, and it seems feasible that the orientation of the log might make a difference. I haven't seen any scientific studies done to prove one method over the other, but someone did get creative in doing comparisons of wood orientation in large tubs: http://lowcostvegetablegarden.blogspot.com/2012/07/vertical-hugelkultur-eliminates-wilt.html. Also, if you look at John Elliot's video post on this thread: http://www.permies.com/t/28038/hugelkultur/Direction-sticks-Hugel-vertical-horizontal, you can also see how roots may like to grow in between the bark and the wood. Pretty interesting!
Delete