Follow "Wood for Food" Blog by Email

Want to stay posted? If you'd like to receive an email when a new post is added to the Wood for Food blog, just type your address in the above field, and click "Submit."

Sunday, June 29, 2014

Going Vertical

"Before" 
This is what the central vertical pit looked like before digging commenced.


This pit began with a lot of weeds for green manure. Our neighbor Ron stopped by with a generous load of rotting pine. His timing could not have been better! I had the good fortune of a visit from the Tonasket Permaculture group planned for that same day... perfectly serendipitous timing. 


We were a small but hard working party of three and we got a lot done! This pit has the most pine of any, and it is on the bottom layer, where I'm most likely to use pine. However, if the pine is well on its way to being rotten, I've found it works well in any of the layers. In this photo, Jason is helping lay down the base layer of pine.


This work party happened in the fall of 2013, just as the first frosts were starting to claim some of the plants. It was handy to be able to use a lot of frosted or finished plants for green manure.


I took down my daughter's Mammoth Sunflower using my bow saw and here Jason is about to toss it in.


Lots of water in between layers...


Next a layer of horizontal spruce.

There was plenty of soil to work with, so we added a layer of dirt. 


And now for the vertical layer! This bed is an experiment that will allow plant roots to access the vascular tissues of the rotting wood more directly. A big thank you to Lee Johnson for bringing the exquisitely punky spruce that made this experiment possible. 

Why vertical? 

The theory is that placing the wood vertically allows the direction of the vascular tissues in the wood to help make moisture accessible to the plants' roots. If you picture the tubular structures of the xylem and phloem running lengthwise through the trees, it makes sense that the roots of your plants might more easily access water by growing into those structures, which are opened into cross sections when the logs are cut to length (like straws within the logs). Compare that with plant roots meeting the smooth natural edge of a log, and it seems feasible that the orientation of the log might make a difference. I haven't seen any scientific studies done to prove one method over the other, but someone did get creative in doing comparisons of wood orientation in large tubs: http://lowcostvegetablegarden.blogspot.com/2012/07/vertical-hugelkultur-eliminates-wilt.html. Also, if you look at John Elliot's video post on this thread: http://www.permies.com/t/28038/hugelkultur/Direction-sticks-Hugel-vertical-horizontal, you can also see how roots may like to grow in between the bark and the wood. Pretty interesting!
(Pasted from the comments section of another post, as it's relevant to this situation)


Here you see Jason and Barbara placing Alpaca manure on top of the vertical pieces, a beautiful dressing to use near the surface where plants can best benefit from the nutrients. (The Alpaca manure came from Chuck and Kathy Mowry on Nine Mile Ranch and can be purchased for $25/pickup load, loaded for you with a tractor). It is an incredible material to bring into your garden. I like to put a handful of it in with every transplant if I can! 


More plants for green manure and lots more water...

And a final layer of soil for planting into.


The following growing season, 2014:


"After"


And to recap...

Mid-stream:

After:
(June 28, 2014)

Side note: It always seems like I have gargantuan amounts of path space in June... but somehow by August there is hardly any place to walk! So I must be on track. The bulk of the vertical spruce bed is planted with potatoes, which are interspersed with onion, cabbage, and marigold companion plants. Sunflowers volunteered throughout the garden and are a welcome addition in most places. 

I would like to put out a hearty thank you to the Tonasket Permaculture group for being involved, and particularly to Barbara and Jason for their hard work in helping build the central vertical spruce bed! What fun it is to work as a team. Thanks again!


Saturday, June 14, 2014

Keep it Growing

Cultivating More Food at Both Ends of the Growing Season...

Earlier this spring, I was finishing up the final bit of last year's cabbage (grown in the garden of friends in Havillah), and I noticed that the base had sprouted roots. "Hmmm..." I thought. "Roots..." I could not resist, so I put it in a pot in the house and watered it. Soon after, leaves emerged.


Amazingly, the plant continued sprouting and has been growing robust yet tender leaves, a most wonderful surprise when the garden is just starting to take off. I think this is going to be a new tradition! It provides a great source for early spring foraging at salad-making time.

The cabbage head spent the winter in my fridge, and I ate from it throughout that time. Imagine this much life coming from a wee little root base! I am not concerned about getting another cabbage "head" -- I am more than satisfied with these wonderful leaves!

I have done this with celery also (planting the base after eating the rest of the plant), although the celery has never looked as vibrant as this cabbage does. 


And of course there is the joy of overwintering sweet peppers, and eating red ones mid-June! This is a lipstick pepper from Harris Dunkelberger's seed, when he had the Good Seed Company (local seed from Chesaw, WA).


*        *        *


I'm always looking for ways to extend the productivity of established plants. I was really happy with the celery last fall, which was growing in the aspen hugelkultur hotbed and continued to produce through the end of October (when the above photo was taken). It's an exciting process to see which plants can do well in early spring and into autumn, and where they seem to grow best. The aspen hotbed had many thousands of tons of manure and hay dumped into it along with the aspen logs, so it is undoubtedly my warmest garden bed. It's also at the south facing edge, and the hill drops off below it, creating more exposure to the sun.


Above is the part of the aspen hotbed bed in which the celery was growing, at the end of last summer.

It's good to think about the fall garden now, so that I can be sure to get seeds in the ground on time for the plants to be mature in September/October.


The swiss chard and daikon radishes also flourished in the autumn garden last year. I want to be sure to get some of both established for fall again this year!


What are your favorite plants for producing food at the extreme ends of the growing season?


Saturday, May 31, 2014

Weeds to Riches

A Glimpse Back to 2012: "Before"
This is the earliest photo I have of this site, located just above the main garden. 

St. John's Wort can be a great medicinal plant, but when it is set free in the wild, it takes over with no regard for what it is overriding. (Here it is seen with an orange hue as the flowers begin to set seed.) Unlike knapweed, St. John's Wort does not stick to areas where the soil has been disturbed. I have watched it swallow up native sagebrush plant communities. In the past there was a lot of houndstongue here too, most of which I pulled manually in 2010 and 2011 before learning about sheet mulching. However, my attempts at pulling the St. John's Wort made it clear that I needed to take a different approach. Enter many truckloads of cardboard and a whole bunch of barley hay...

After applying a generous dressing of fresh manure for heat, then laying cardboard down and layering the barley hay on stop: smothering works! I used barley hay because it was available for free, and because it came with a cover crop seed built in. (Funny how this made it undesirable to others, but doubly useful for me!)

Little by little, the St. John's Wort retreats.


2013: The barley seed has sprouted and I've planted a few tiny rhubarb plants from my neighbor's garden. I've also moved some extra strawberry plants in from the main garden area and added more apple trees.

The rhubarb is growing, and the first smothered area is taking on new life... but in the foreground you can see there is still a lot of St. John's Wort to contend with.

I saw no reason why this project couldn't happen during winter, so I gathered up as many leaves as possible in the valley and brought them home at every opportunity -- for mulch on top of the cardboard.

This time around, I went without manure. While this method lacks the heat component, it also avoids introducing new weed seed to the site. The manure worked great for helping rot the St. John's Wort plants under the cardboard (and for building rich soil), but I did find new weeds cropping up as the cardboard decayed. I'm always up for tweaking the process and comparing results. 

Slowly the weeds made way for cardboard and leaves. I also added an above ground hugelkultur bed, but that is a topic for another day. 

In some places I experimented with using old cotton fabric sheets instead of cardboard, and they were a lot easier to work with, with the added benefit of being much more durable. 

I am thankful for all the people and businesses who have shared cardboard and leaves with me!! Thank you!


Early May 2014:
The snow is gone, and so is the St. John's Wort! 

I added Ponderosa Pine branches from some forest thinning that my husband did. These branches turned out to be critical to the success of the cardboard/leaves method, as we had some strong spring winds that began blowing the hard-earned leaves away! As I ran about laying more branches on top, they did the trick in securing the leaves to the ground. *Whew* This ain't Kansas, but the winds sure can blow sometimes. 

I'll take layers of debris over weeds any day. There can be concern about fire hazards when layering debris. However, if you irrigate, pine needles and leaves turn into beautiful compost. Even without irrigation, over time this is a soil-building process.

This is how it looks today, May 31, 2014. The orange hue you see now is from pine needles, which will rot and make the soil richer -- helping other, more desirable, plants to grow. 

Zooming out a little, you can see the context of the larger area. The posts form cages around apple trees, six different varieties. What was once a choked-out noxious weed zone is now supporting rhubarb, strawberries, horseradish, garlic, lettuce, valerian root, and asparagus. I didn't actually intend to make a garden here, but after hauling in loads of manure to help rot the weeds out, and after seeing the space open up, it naturally became our "garden annex." 

Weeds to riches, no doubt about it!

Sunday, May 4, 2014

Gardening with Marmots

Yellow-Bellied Marmots are, admittedly, very cute. They are also voracious eaters and especially enjoy mowing down promising-looking carrot and pea plants. We have a lot of rock outcrops and piles of boulders, making our property excellent marmot habitat. They are here to stay, so I've been thinking long and hard about how to successfully grow a garden in tandem with their appetites... I mean, a garden that we get to eat from too! 


Hardware cloth is the first order of the day. I've been running it along the bottom of the deer fence, making it less convenient for marmots to run into the garden whenever hunger strikes. As you can see, I've run it vertically along the lower 2-3 feet of fence, and then horizontally along the ground for another foot or so. I placed cardboard underneath for weed control -- fencelines just seem to invite difficult weeding situations. Then on top of the ground-laying hardware cloth I piled wood chips and rocks.


You will notice I said, "to make it less convenient." We have watched baby marmots climb up and over 4 foot tall chicken wire, so I am not under the illusion that the hardware cloth can actually prevent them from entering. They are good at burrowing under barriers, so on the south section of the garden that faces their favorite rock hangout, I piled many gallons of small rock on top of the hardware cloth. But if I stopped there, I would still be inviting disaster. 

Second order of the day: Sacrificial garden beds. Above is the first garden bed offering for the marmots. It is a raised bed (made with, you guessed it, rock!), and here you see various weeds I pulled for a nitrogen layer in the soil. Under the weeds are some pieces of wood... Yes, even the Yellow-Bellied Marmots get their own hugelkultur bed here!


Next a layer of hay... I'm sure it will sprout lush orchard grass, which they will probably appreciate. Even if they don't eat the grass, it will help draw their attention. 


Then a layer of soil and a wide variety of seeds: carrots, lettuce, sunflower, calendula, radishes, peas, etc. This may not be enough, in which case I'll add more sacrificial beds.


It can be very challenging to grow food in a dry climate with lots of hungry animals all around. The chipmunks love cherry tomatoes, the gophers love carrots, the deer get desperate in September... the list just goes on. You've heard it all before. But there are benefits too, besides the fun of seeing so much wildlife. I am looking forward to (hopefully) having the Dusky Grouse in the garden again this year... they love to eat the slugs, and I just cheer them on! (Yes, we live in a semi-arid climate and we have thousands of slugs... but that is a topic for another day.)

In the meantime, we're hoping for harvest success through the combination of making it harder for marmots to enter, and enticing them with greens outside the garden fence. Fawn and I have also added cages around some of our favorite asparagus and strawberry plants, just in case the marmots get in, for a double layer of protection. Thankfully they estivate starting when summer gets hot, so we only need to keep them out of the garden for the first part of the growing season. (Estivation is a summertime hibernation to avoid the dry part of the year when food is scarce. I'm grateful that the marmots employ this survival strategy -- it takes some of the pressure off the garden!)

What do you do, to preserve some of the harvest for human consumption?  
I'd love to hear about your creative ideas and techniques; please comment below.

Wednesday, April 23, 2014

Underground Cold Frame - Part I

Here's how it happened:
Using the backhoe, my husband dug this pit down to the bedrock, making it as deep as possible. The idea was to have a full hugelkultur layer with a cold frame on top of it, but also underground.

I'm happy to say that with a bow saw, I can now do a LOT more than I used to. Thank you, Lee! I ♥ good friends who help me see things from a different angle. This was the first load of wood that I cut, just elbow grease and a bow saw, plus my 7 year old daughter sometimes on the other end of the saw, working it the old fashioned way with me. Great memories... She also liked jumping on the logs to try and get that final break to finish each cut. Nature's trampolines!


This is the base layer of random rotting wood from around the property, mostly Ponderosa pine and Douglas fir -- with horse manure on top.


After finishing off the first manure layer, I discovered that a mister is the ideal way to hydrate a hugel bed in progress. It provides just enough moisture for the organic materials to wick it up, but not so much that the water runs off. A mister is a great addition to any garden -- it will cool you off in the summer and provides interesting low-flow, gentle irrigation options!


A second load of wood, also mainly scrounged from around the property with a bow saw. What a great workout, whew! There are also a couple of large diameter spruce pieces from Lee's property. (Thanks!)


More horse manure, gotta love how *hot* it is, for these base layers especially.


At the half-way mark in filling this pit: a helping hand in creating a soil layer


Part two begins, with a solid layer of hugel below the soil.


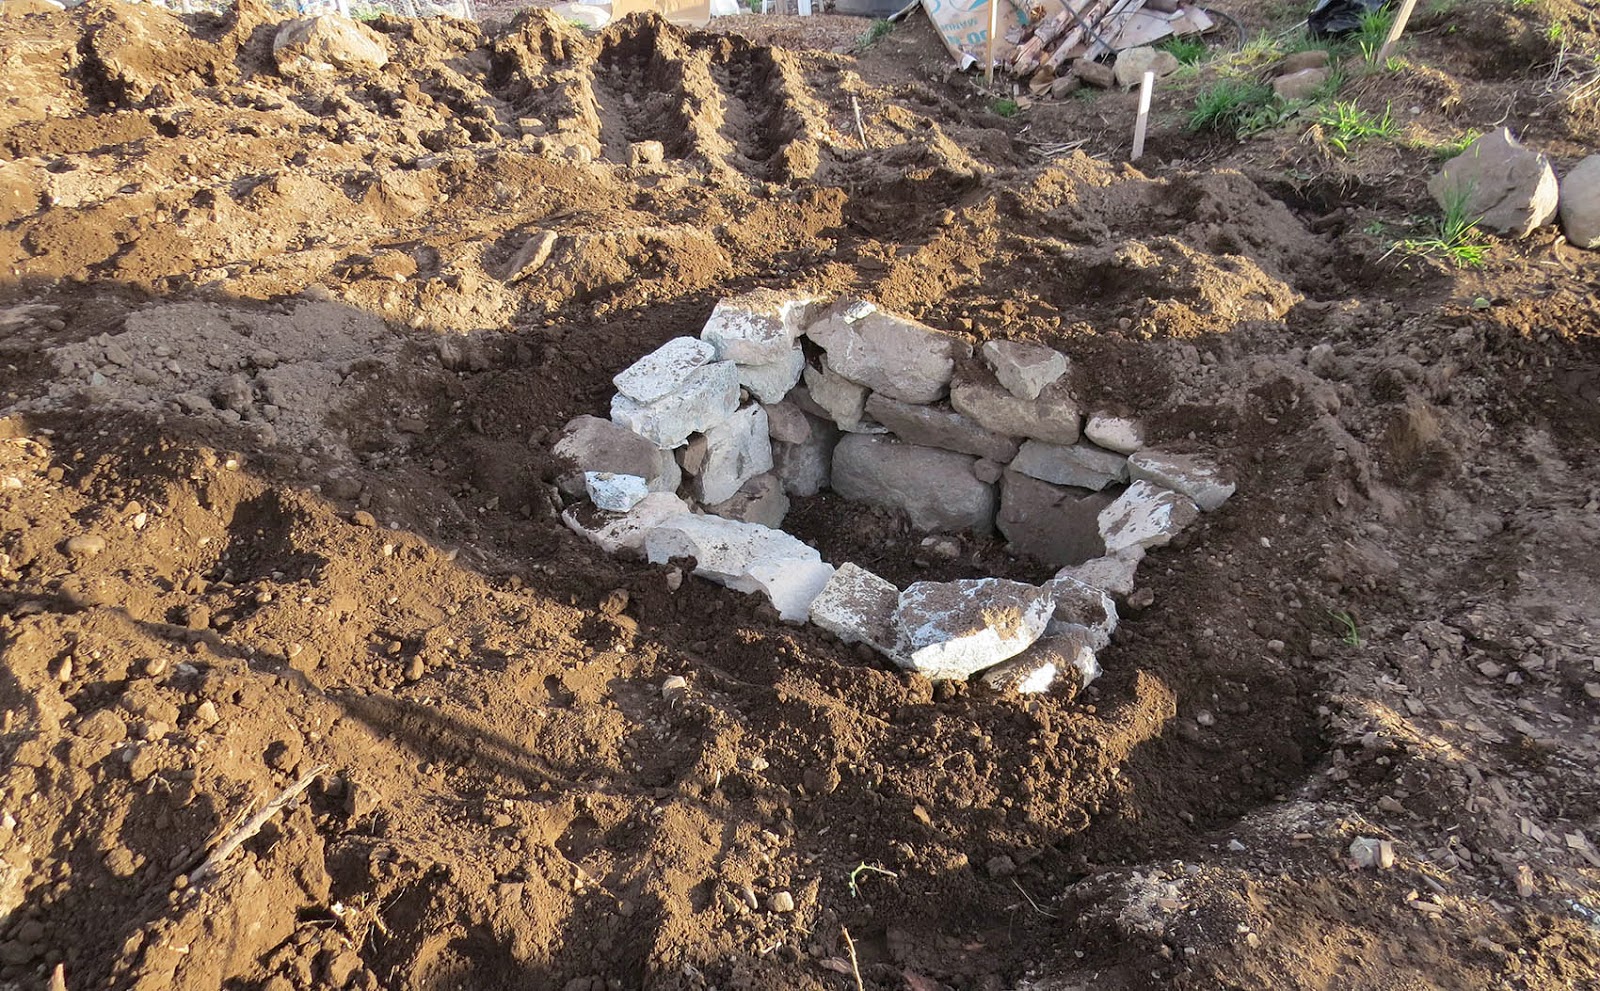
Enter rocks for the underground cold frame!


A few rocks at a time… building muscles in the universal gym of the great outdoors.


Just trying it out -- this is the concept I'm after! Thanks, Dad, for the window. :-) Yes, I brought it all the way from Vernon, BC (they didn't mind at the border). He even drilled holes in the aluminum frame for me, and provided me with hinges -- wow!  I ♥ my Dad.


I added some hay found on the side of the road by a neighbor (when you are burying the hay this deep, you don't have to worry about weed seed). Man, I love living where we do -- what a great community. Our neighbor showed up with a trailer full of hay after his family hay rides were over. Sweet! Thanks, Ron.


Dry fitting rocks is a lot more difficult that I realized, but fun in a puzzle sort of way. I still can't believe I moved that front rock -- but sometimes bigger is better and it was definitely worth the effort.


With the main part of the cold frame set in place, I was ready to layer in hugelkultur materials around it.  First horse manure...


…then wood. This time my husband, Bob, bucked up a bunch of rotting wood into roughly 3-4 foot lengths, mainly pine that was laying around ever since the fire on the property around 10 years ago. I added in some alder from Lee along with some other longer pieces I had laying around, and managed to add another full layer. My mantra is generally, "Use what you have available!" 

Note: Sometimes it makes sense to put the wood in horizontally because you have smaller diameter wood readily available, and also there may be time constraints in bucking it all up into short lengths that can stand on end. When possible, I like to put the wood in vertically to provide plant roots the opportunity to utilize the direction of the vascular tissues in the wood for accessing moisture. That way, the tubular structures of the xylem and phloem that run lengthwise through the trees may provide easier access to water as roots grow down into those structures. The xylem and phloem are opened into cross sections when the logs are cut to length (like straws within the logs). However, with very rotten wood, all of those structures eventually break down, and then the orientation of the wood placement won't really matter. Most of this wood has been in the process of decaying for a long time, so I'm not too worried about the orientation.


Yet more horse manure -- I really want this bed to cook, and help heat the cold frame!


The final step was to spread soil over the hugelkultur and around the underground cold frame.

Bob pulled in soil that was piled in the surrounding area, from when we dug this pit. Unlike other areas of the garden, this spot actually produced a lot of soil instead of mainly rocks -- jackpot!

 Full circle! The soil that came from the pit is returned to the bed.

I smoothed the soil with a shovel, piling it closely in around the rocks. Now the cold frame is actually underground, as intended.

Next will come the finish work in turning this structure into a functional cold frame. But that will be for another post. It was a long process getting the bed to this stage, and I'm excited to see what will grow in this sunken rock space, not to mention also around it on the surface!