Follow "Wood for Food" Blog by Email

Want to stay posted? If you'd like to receive an email when a new post is added to the Wood for Food blog, just type your address in the above field, and click "Submit."

Sunday, March 22, 2015

Apple Tree Rescue

In 2012, I ordered six apple trees: Idared, Gravenstein, Honey Crisp, Jonagold, Yellow-Golden Delicious, and Northern Spy. I really only wanted three trees, but knew how unlikely it would be to have 100% survival.


The Gravenstein was the first to bloom, in 2014. The pink buds turned to white blossoms, a promising kind of beauty. Note the white rodent guard at the base of the trunk (at right). 

Somehow I had believed that the Gravenstein would survive all the rest, because my mother remembers eating them as a little girl, from a tree on the prairies where she lived. Also, my father made Gravenstein apple sauce one year when I was growing up, and it was the best apple sauce ever. The family connection makes this my favorite apple tree.


The rodent guards did not protect the trees from rodents. Above is what I found during my first check-up on the trees this spring, 2015. The Gravenstein and the Honey Crisp were the two trees to be hit. (Ironically, the other four had been hammered by deer in the fall when they crunched down the fencing, but at least those trees were still rooted!) At first I thought that these two were lost. It's funny how you can plant extra knowing that some will die, but when the time comes, it's hard to let them go. I did my best not to be devastated. Then my gardening friend Ying told me that she had this happen too, and that she plunked them back into the ground -- and they grew roots and lived! Perhaps all is not lost for the two trees that were taken down by small rodents acting like big rodents (beavers).


My husband mentioned an old tradition of using moss to help with grafting. My daughter and I had recently noticed that our favorite mossy outcrop had been pillaged by wildlife, pulling back chunks of moss off the granite -- perhaps deer.


We had propped up some of the moss against the rock, hoping it would re-attach. Lots of other pieces lay scattered about. This created the perfect opportunity for moss harvest, since many of those pieces were likely to die, exposed to the elements and separated from their base.
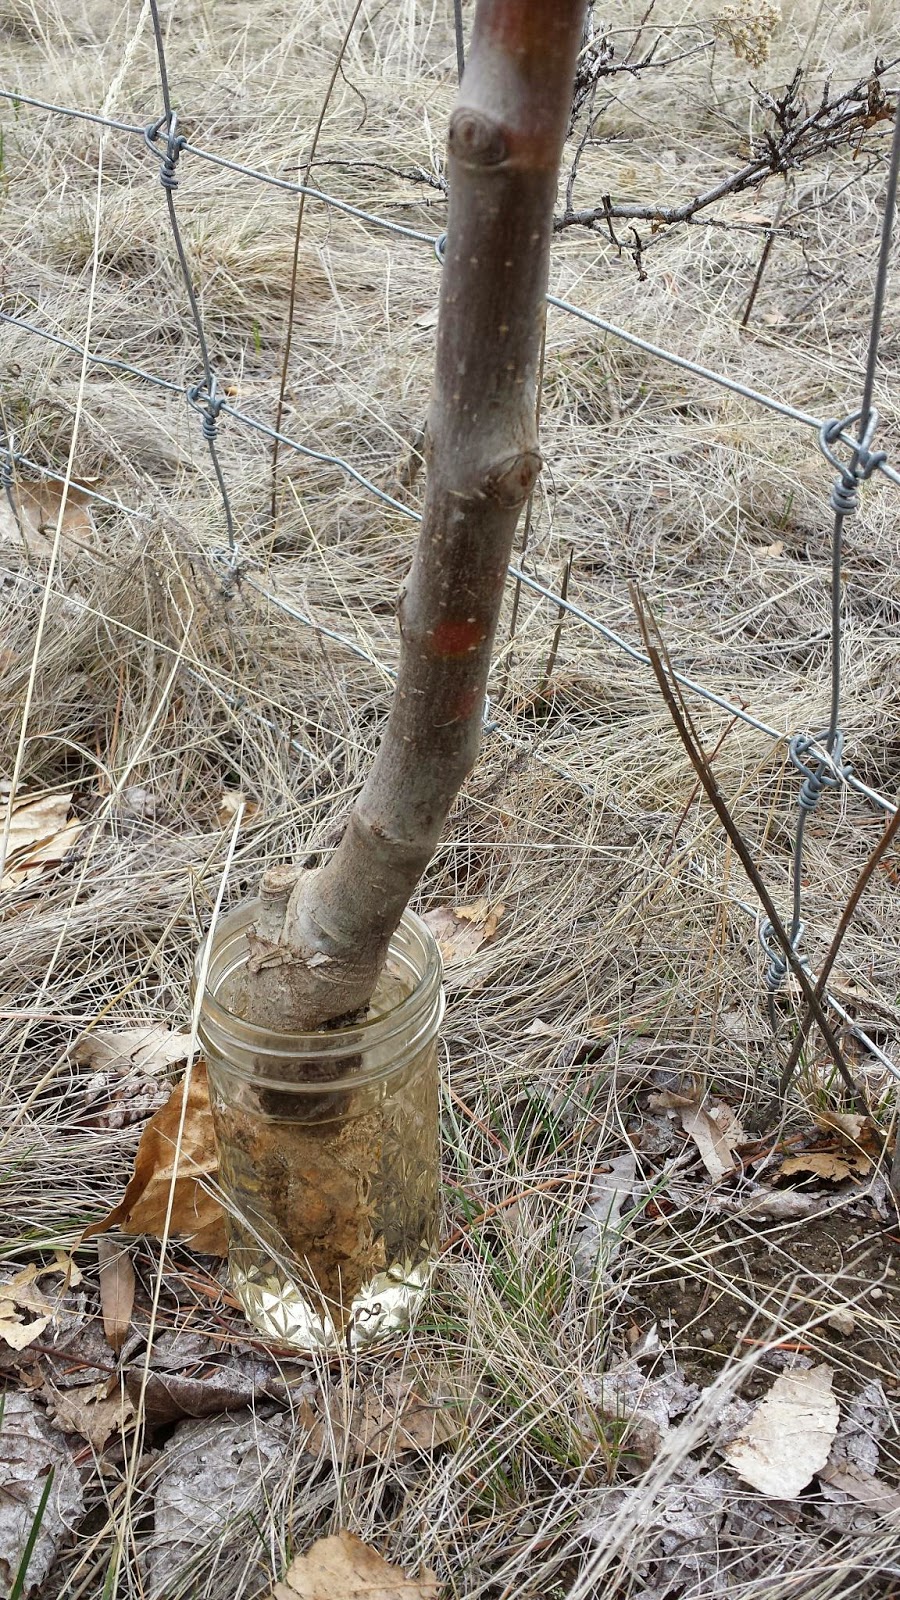


I soaked the chewed ends of the trees in water while preparing to replant them.


You know how it can be helpful to nick a cutting before planting, to stimulate root growth? I figured these trees were already nicked!


I placed a few tree treats in the hole first 
(the one growing benefit offered by the deer!)


Next I sprinkled rooting hormone on the moss and the base of the trees.


I wrapped the trees in moss and then leaves...


Placed them in the holes, added more moss, tamped it down...


...and added water, soil, and more water. 
I made a point of keeping the graft points above the soil level. 


Last but not least: a much more robust rodent protector, with metal mesh wrapped around, folded down along the ground, and held down with rocks. Here's hoping!

Monday, March 9, 2015

Life within the bed covers

March 8th was an exciting day! 
Inside the first low profile marmot and cold protection frame: 


Signs of life...


So encouraging...

I found lettuce and radish sprouts! Sprouts in the garden in the first part of March is a reason to celebrate around here. I planted it on February 21st, and the weather has been unseasonably mild... but still down to temps around -10 Celsius / 14 F during the nights last week. Warmth during the day only is not good enough for growing food, and these frames have been doing their job during the cold nights. 


An update on the lids: I decided that slipping clear plastic bags over them was not going to work. Too much moisture was condensing inside the bags, which would rot the lids, and the bags tended to flop around in the wind and drag down too low, almost to the soil, underneath. The above photo shows my large frame (8x6') with the lids revised.


I pinned plastic to the underside of the lids, up against the hardware cloth, by screwing on thin strips leftover from ripping slab wood. The strips hold the plastic to the inside of the frames. 


Then I added a rib down the middle to help support the underside of the plastic once the lid was placed on the frames again.

Here's how they look placed back on the frames. Much neater, too! 


I also added hinges using eye-bolts and fencing staples with a piece of twisted wire in between. These will help keep the lids on during windy days, and will make access easier. The wire can be removed if I want to take the lids completely off while working. 

So far this marmot and cold weather solution is really working well! I can't wait to build more frames.

Update: We've been eating salads from this frame throughout April and May, the earliest greens yet. It was an exceptionally warm spring, but these were by far ahead of other greens not protected from the elements and the marmots.

Friday, March 6, 2015

Vegetable Jail Season Extension


It's so much more fun to have gardening friends to share ideas with. 

When my daughter and I first began the effort to turn our knapweed patch into a garden, Jackie Chambers recommended the book, Gaia's Garden, by Toby Hemenway. Gaia's Garden was precisely the window I needed at that point in my journey, beckoning small scale agriculture to merge with ecology in a way that I know I'll run with for the rest of my life.


Jackie Chambers and I enjoy exchanging ideas as we each ponder the best ways to extend the growing season where we live. In this blog post, Jackie interviews me about my most recent experiment, which combines protection from cold weather with protection from marmots and other wildlife species that have a proven track record of simply not sharing


 (Who, me?)
   Above: My daughter and I caught several marmots in the garden last summer and relocated them.

I was excited to tell Jackie about this dual purpose experiment, and she wanted to see what these bed covers look like.

Left: Simple base frame, made from old 2x6 lumber
Middle: Base with simple lid frame made from 1x2 lumber, with hardware cloth stapled on
Right: Clear plastic bag slipped over the lid to extend the growing season

This is the first marmot and cold weather protection frame I made. I used old lumber that had been sitting behind our shop for years, leftover from the previous property owners. This wood was on its way to rot out of sight behind the shop, but now it will live out its last years with a new purpose. 

This is the general design I'm planning on using this year. I figure that I can always build a sloping base for these frames later if I decide I want them angled toward the sun. I love modular projects that can start out simple and then be improved upon and added to over time. The rest of this post is written in question-and-answer format.

Jackie: 
How large are they? 

Julie: At this point, they vary from 3x3.5' to 6x8'. I'm into using whatever I have available or can trade for instead of buying supplies, whenever possible. The
 guiding factors on size have been the width of the hardware cloth, the length of lumber available, and the size of the garden bed they will be used in.

1. Width of the wire: I happen to have 3' wire mesh on hand, so all of my lids need to be 3'1" wide. If you are buying whatever you need, then you'll have more options of course. Keep in mind that you can have rows of lids across a single base frame. So I've got one base frame that is 6' wide, accommodating 3' wide lids. 

2. Maximum length of lumber: Again, I'm using what I have on hand. Since none of my slab wood was more than 8' long, my largest base frame is 8' long.

3. Size of the bed where the frame will go: I like to leave at least a foot or two of growing space around each frame to account for my sacrificial plants. These are the radishes and other easy to grow veggies that keep the marmots happy enough that they don't feel a need to dig under my base frames. Here's hoping! So far this tactic has worked well for me.

The largest lid turned out to be kind of unwieldy at 3x6 feet, so the other half of the large base frame has two smaller lids instead. This has definitely been a learning process!

Jackie: 
How tall are they? 

Julie: For height, the question is, what do you want to grow? Also, how many months of the growing season require protection? It's amazing how many veggies don't need a lot of vertical space even through harvest time, as long as you aren't raising seed to save. I'm making an effort to save seed in the feral parts of my garden, and to focus on the harvest of foods within my growing frames. the width of the board determines the height of the bed cover. I like the boards for my base frames to be at least 6-7" wide, which makes a frame tall enough to accommodate radishes, beets, greens, strawberries, etc... and maybe even Tiny Tim tomatoes! (My all-time favorite high elevation tomato.) Carrots will need more height eventually, but not till later in the summer!


If you used 2x4's and ended up with a 4" tall base frame, it would still give you quite a lot of time before your plants outgrew the height. For example, at our elevation and exposure, carrots are not going to be 4" tall until the danger of a hard freeze is well in the past. You can always stack another frame on top for additional height.


I'm focused on making these as low profile as possible, to avoid having any more of my contraptions ending up in a tree. Live and learn, adapt as needed!

This frame is 7" tall. I had no idea that making a 6x8' frame would be such a workout! I think moving it was the most demanding part of the whole project, but I finally did get it in place. Afterward I felt like I'd been playing rugby, not building a super simple garden project! Here I am positioning the frame, trying the lids out, seeing if it's all going to work... 

This is the first one I've made using slab wood. I used a skill saw to rip a straight line along the edges, so the frames would have a square surface to rest on. My husband ran the other sides through the table saw, but some pieces I straightened on both sides with a skill saw -- since I'm a southpaw who doesn't like the backwards feel of the table saw. Somehow the backwards feel of the right-handed skill saw is less disconcerting.


Jackie: 
How long do you leave them in place?

Julie: I have to protect against marmots till July if they estivate, or all summer if they don't. Sometimes when you irrigate, the marmots opt out of summertime hibernation!! (Why sleep when the eating is good?) Whatever plants I cage, those are the plants that end up feeding us, and they often need caging on an ongoing basis... thus, "Vegetable Jail." Then the season extension comes into play in September again,  so I may just leave the frames in place throughout the growing season. I'll pull the plastic off when it gets warmer out. (Above: One of the marmots we relocated, after we set it free.)


Jackie: 
How long does it take to build one?

Julie: I can build one in an afternoon. It'd be a lot quicker if I wasn't ripping boards length-wise! I think once I get the hang of it, I could build a smaller one in a couple of hours.


The soil in the rest of the garden is too frozen to sink a shovel into, but inside these frames, the soil is supple and ready to plant.

This spring, when the marmots wake up, I'm going to be ready for them. And in the meantime, I'm direct seed sowing some of the veggies I would normally need to start indoors (or start much later), in the relative warmth of these covered beds. 


Saturday, February 28, 2015

Cold frame fun

At long last... a standard cold frame! I've always wanted to build one. 


My first traditional cold frame started off with some very thick, gorgeous (but on their way to rotting) boards from behind our shop. My dimensions were based on the size of a window my Dad gave me.


After building the base frame, I set about making the sloped sides. I'd never used triangular pieces for creating slope before, and it took a few tries with the chalk line to get it right. A chalk line is a great way to experiment visually without making any permanent errors. I found that I wanted a flat top on the triangle, to align with the rest of the frame, so I made allowance for that and just made sure the bottom of each triangle matched the length of the frame. This is a spruce plank that my husband milled.


Here is the sloped frame resting on the base frame... ready to tackle fitting the window.


Perhaps the most important concept I've found when building a sloped cold frame is that a solid roof on the North portion will not block sunlight. This may seem contrary to what you'd imagine. However, I've tested it out with the underground cold frame and it's definitely true, particularly during the months when the sun is lower in the sky (which is when you most need the cold frame). Most of your sunlight will be at the north end. This means you should really consider expanding your well-lit real estate inside the cold frame by making the frame longer than the window.


If you look closely here you'll see that the solid portion of the top is not blocking any light. Only the front and sides are.


I am super lucky that my Dad fitted this window with hinges before giving it to me. What a lovely surprise! Thanks, Dad!


Here is the cold frame in its new garden home, on top of the Horizontal Spruce Central bed. Hopefully this structure can capture some of the heat that is probably rising from the decomposing hugelkultur below. 


I added a pivoting arm to hold the lid open as needed. It consists of an edge from slab wood held to the base frame with a nail that is pounded only partway in. 

I'm really happy with how this cold frame turned out. Although there are still some clods of frozen soil, this bed was covered and had thawed out enough to plant! February 28th and I planted carrots, onions, and radishes. I had forgotten the radish seeds earlier, so I walked down to the garden after dinner and planted them in the moonlight, with Venus and Mars above me to the west. We'll see what happens next inside this frame... The weather has been unseasonably mild, so I might as well take advantage of it. This cold frame helps me do just that. Plus, it will keep marmots out, once they wake up!

I'm feeling ready for spring.

Sunday, February 8, 2015

Despite Snow and Ice

On this long-awaited sunny Sunday morning, I headed straight for the garden. I was expecting muck, wet snow, and ice -- but what the garden had to offer exceeded all expectations.

Look who doesn't mind a little snow and ice!

I am pretty sure the shoot emerging straight from the ice is French sorrel, which will undoubtedly be one of the first salad greens from the garden this year. It is growing in the center of the Aspen Hotbed, the warmest seat in the house. I can't think of what factors other than warm toes would cause sorrel to rise out of the ice like this. Yeah, hugelkultur -- I think it's working! 

One of the more hotly debated potential benefits of hugelkultur seems to be the idea of a longer growing season due to heat generated by decomposing wood. This Aspen Hotbed has lots of large diameter aspen in it, but also contains a massive load of horse manure to keep things warm. Apparently manure was used successfully to heat veggie beds in France hundreds of years ago, when the streets were filled with horse-drawn carriages generating more manure than people knew what to do with. The combination of large wood and manure in my Aspen Hotbed seems to be an effective strategy for our climate.


More sorrel as well as Johnny jump-ups.  


I discovered some mystery shoots in the first Aspen Bed, which has plenty of aspen buried beneath the ground, but only a modest amount of manure.


I'm hoping this might be celery, which I planted at the end of last summer. It didn't germinate then, but perhaps it is germinating now!

More potential celery... (?)

The strawberries don't mind a little snow at all!

The grape hyacinths are greening up under their bed of willow leaves.


These raspberries are growing in the Alderwood Bed, and again it seems that having warm feet must be making a difference. If your raspberries are sending out green leaves despite having snow on the ground, please let me know in the comments below! I'm curious about how common or unusual this might be.


Either beets or rainbow Swiss chard has overwintered! I think these are beets but I'm not 100% sure. Time will tell. Either way, I see sautéed greens in my future.


Of course the catnip is always one of the first plants to green up...

...but how about marjoram? This one is growing in the Blueberry Spruce Bed.

This Swiss chard sits near the top of my Sunday morning miracles list. It overwintered in a bed that is caged around the perimeter with hardware cloth fencing, lined with a combination of fabric, grass mats, and clear plastic. However, there is no roof on the cage, so I did not expect anything to overwinter. We had some very cold snaps in early winter, too! Maybe it doesn't take as much protection as I had thought...

My garden fabric hoophouse collapsed under the snow, but lo and behold, there seems to be green showing through the reemay! I couldn't check underneath to see if it really is alive, because the garden fabric is thoroughly frozen to the ground on all sides, under snow and ice. I'll just have to wait for things to thaw. If I'm lucky, it will be rainbow Swiss chard from last summer!


What a feast for the eyes... lush green against white snow. I realize that we would have a better summer if we'd had a better winter, and that we need our snowpack to feed our streams more gradually, and that spring in February in North Central WA could spell bad news in a variety of ways. That being said, I am going to make the most of it, and soak up the magic of plants alive and growing in the garden! It's reason to celebrate; I can't feel any other way.

Cheers!