Follow "Wood for Food" Blog by Email

Want to stay posted? If you'd like to receive an email when a new post is added to the Wood for Food blog, just type your address in the above field, and click "Submit."

Wednesday, September 27, 2017

Un-irrigating

You sometimes hear about hugel beds that have gone without irrigation, even in dry climates. I have not had to water as much since developing my wood for food garden beds, but up until this summer I had never cut irrigation off completely. 

This year I decided to try stopping irrigation in a few places to see how the plants would fare with only the moisture from the rotting wood. Once in a great while I sprinkled a little water from a jug (a few times over the whole season), but these plants were not really watered. And -- we went for about 80 days with no rain this summer!

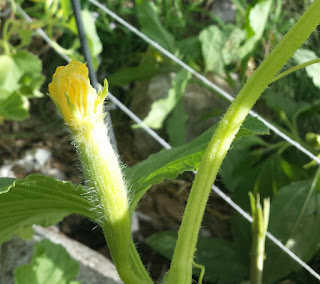
This zucchini plant is in the center of the non-irrigated bed, with aspen logs and manure underground. It has beautiful zucchinis on it now and looks more robust than some of the other zucchini plants I have growing in an irrigated, non-hugel bed. 

The potato plant next to the zucchini is doing just fine too. On the other side of the zucchini, I dug a hole yesterday and found the dry soil to be full of potatoes, with no plant in sight. It appears that the plant formed its potatoes and then died, perhaps due to lack of moisture. However, I harvested the most beautiful red potatoes I've ever grown -- beautiful skins, no blemishes, perfect flesh. Works for me!


This zinnia may have picked up some moisture from a neighboring micro-sprinkler, but the Swiss chard and celeriac in the background were not irrigated at all. (The zinnia is coming into the picture from an acute angle -- its base is a few feet away.) Both the chard and the celeriac volunteered in the straw-mulched path, and I just let them go. The path receives no irrigation, but they didn't seem to mind at all. They are growing in a mixed-species hugel bed. 

Based on these experiments, it seems that you really can grow food without irrigating, once you have a moist sponge of wood available to your vegetables.


Happy fall gardening!

Saturday, September 10, 2016

Totally coasting

With the Wood for Food garden heavily front-loaded with hard work, I have been coasting all summer. The self-perpetuating garden -- a basic tenet of permaculture -- means that you can set things up for success and then enjoy the results as you are able.


The summer of 2016 nearly swallowed me whole, so the garden took a backseat to the rest of life. The plants did what nature does: they carried on happily without me. I would visit the garden whenever I got a chance, and pick some raspberries or a carrot or some greens, and whisper gratitude in my heart for these good things.


The Swiss chard bolted, but it had also gone to seed last year, so there were lots of new seedlings throughout the summer (above).


When I had the time, I'd trellis the beans or squash or cucumbers up their tipi or archway, and maybe pull a few weeds. With the paths and spaces all sheet mulched, there haven't been many weeds. Mushrooms continued to pop up everywhere. The timers opened the valves for drip and micro irrigation while I slept at night, but in some areas I decreased irrigation because the plants didn't seem to need much.


It has been a real joy to excavate the garden area and fill the pits with large wood, hay, leaves, and manure. It has been great fun to see what will grow here, and how, and to learn through the university of life what works well. I've enjoyed sharing the results through this blog, and will continue to share from time to time.


I enjoy the colors, the tastes, the textures, the smells. (Above: beets and the perennial Maximilian sunflower)


2016, the year of the many mini-harvests...


I enjoy seeing the birds nesting in the bird boxes, eating the grasshoppers and slugs, and flitting and singing around me. We've had Western bluebirds, house wrens, white-breasted nuthatches, and kestrels in the nesting boxes, plus lots of sparrows in the garden. The swallows have shown keen interest in the nesting boxes... maybe next year they will raise young here too.


This year the Armenian cucumbers are far behind where they were last year at this time, but it's still possible that we'll harvest some before the first frost. It was 3 degrees Celsius or 38 degrees Fahrenheit the other night, but we evaded frost, just barely.


Red and green orach remain my top favorite greens -- for coming up first, bolting last, self-seeding, and tasting great the whole season through.


We've got our first apples this year! They are Idareds. Last year there was one, and the wildlife got it. This year, there are six, and it looks like they are ours. Happy dance!

The best part of this garden has been sharing it with my daughter. I'm so glad we started it together when we did.

Thank you for checking in and sharing the joy with me. I will continue to post on this blog as I'm inspired, but not on a regular schedule. You have seen the Wood for Food garden rise out of rock and moondust, and now it is time for coasting.

Enjoy your own garden space, stack those functions, and I hope that you will have the opportunity to coast too. 

Thursday, June 30, 2016

From weeds to mushrooms

Noxious weeds are abundant, especially this time of year and especially in our region. A little earlier this spring, I decided to reduce my weeding work throughout the next couple of years by sheet mulching some new areas, and re-doing some older sheet mulches that had decomposed. After discovering morels this spring along another sheet mulched area, I've been inspired to take weed suppression to the next level, by encouraging edible mushrooms to grow wherever I smother weeds with layers of organic material.

In my rhubarb garden, I laid old cotton sheets on the ground between plants. In the early spring, it looks like they are well spaced out, but by June, rhubarb covers this whole area. Weeds tend to hide under the plants and produce seed before I realize it. Smothering the open areas solves that problem.

Over the sheets I laid comfrey leaves harvested from the companion plants to my nearby apple trees.

On top of the comfrey, I arranged pieces of bark and slab-wood from my husband's sawmill. (Slab-wood is the edge of the log that has bark on it, which is removed to make a square cant for milling.)

I worked around some native plants that I enjoy, such as lupine and wax currant. The finished product: no weeds, and the rhubarb begins to take over...

Meanwhile, in another area where I was also installing fence, I used a similar process, driving the t-posts directly into a small hole in the sheets. This made a nice seal for keeping weeds out of the base of the post.

In the fencing area, I put slab-wood over the sheets and covered the whole thing with sawdust. 

(Before)
This pom-pom shrub was surrounded by invasive St. John's Wort. I smashed the weeds down, and laid cotton sheets overtop, working around some native bunch grasses.

(After)
Next I added slab-wood and leaves from last fall. It will be interesting to compare the results with the sawdust vs. comfrey vs. leaves for mulch, in combination with the same slab-wood.

Now to the next level: encouraging edible mushrooms.

The first method I tried was drying morels on newspaper, allowing the spores to fall onto the paper. I turned the morels every now and then to maximize the amount of paper inoculated with spores and to encourage even drying.

I put the mushrooms in jars to eat later. Then I tucked the newspaper under my slab-wood sheet mulch, favoring those pieces with charcoal bark from trees that burned during last year's Nine Mile fire. Since morels flourish following fires, I figured this might potentially encourage them to grow.


The second method I tried was the slurry method. I started with a glass gallon jar of water.

I added some water with molasses and sea salt, which had been heated together in a saucepan. 

Next I added the morels...

...and let it sit for a couple of days in a cool, dark place. Then I put the slurry into zippered plastic bags, and put them in my deep freezer. Next spring, when conditions are wet, I will pour the slurry onto my sheet mulched areas and see what happens!


Saturday, May 28, 2016

Hugel in a Pot

This year we are exploring the use of hugelkultur in container gardening.

The first order of business is to find a large pot. It does not need to be this large, but big can be fun! We were able to pick this one up for free (what a score), right after leaving the Seed Library's container gardening class (what fun). Fawn had a great time playing in it, like a big cardboard box but even more exciting, somehow!

I washed the pot with soap, water, and a natural enzyme spray. Before planting, I checked out the drainage situation. The pot only had holes in the bottom -- no bueno, as I had just learned from Master Gardener Tory Shook in the Seed Library class. Unless you're going to prop the pot up off the saucer, those holes on the base are not going to drain properly and may wreak havoc with the roots.

I drilled some holes on the sides at the base, for adequate drainage. Ready to plant!

Wait, not ready yet. First we need to play with the pot some more.

In the meantime, I made sure I had some planting materials ready. Here you can see a CanAm load of native soil, sand, well composted horse manure, and bark pieces. In the front seat is a nice big round of rotting aspen.

The native soil came from a special, unusual pocket on our property where the soil is dark and fluffy. Jackpot!

It feels so good in your hands, especially after you sift it.

Here we go...

But before placing any of that beautiful soil in the pot, we started with the aspen. It is sitting vertically in the pot to provide optimal access for plant roots to penetrate the rotting wood tissues.

Around the aspen we placed many pieces of bark from edging wood on the sawmill. Any kind of bark or sticks would do.

Now the sand and soil...

Smaller bark pieces...


...and lots of composted manure.


Water...

...and spearmint that was given to us from someone who had plenty to share. Since mint can be that way, we opted to plant it in our best container ever, to contain it! We can already picture mint tea on a chilly winter day.

*          *          *

Here are a couple of other ideas for utilizing wood in your container gardening:

Off-cuts from natural, untreated lumber


Punky, rotting firewood pieces, laid at an angle to fit, or placed vertically

However you slice it, wood is a great addition to your containers. And on top of acting like a sponge for moisture, wood helps create the mass you need to fill your space, too!

Please feel free to share your container gardening tips in the comments below.


Saturday, May 21, 2016

Hugel on the Rocks

Where can you use hugelkultur? Are there limitations on the kinds of places in which this method can be effective? Seems like there is only one way to find out...

On a granite outcrop near the garden, I would like to install a windbreak, privacy barrier, and shade area. This truly is hugel on the rocks. The granite bedrock is visible throughout the area, with just enough soil in between the protrusions to support some lovely native bluebunch wheatgrass, magnificent bitterroot flowers on the edges, a thick profusion of not-so-lovely invasive St. John's Wort in the center. (Above you can see beds #1 and #2 before they were covered with soil, and the rocky setting in which they are built.)


I started off by laying sheets and cardboard down over the St. John's Wort, in an effort to suppress it. Next I piled up rounds of spruce from Lee in Wauconda, short pieces about 16" high, in circles.


In the center of the top layer of rounds in bed #2, I planted lilacs that were given to me. I included lots of horse manure from my neighbor along with a little soil, compost, and hay.


Our dog, Kwilly, looks innocent enough here -- but we won't get into the number of times he tore the rounds apart to get at the compost I layered under the lilacs. Note to self: use completely composted food scraps only!

Layer one of bed #3.

Between some rounds there was a gap, so I stuffed it with punky spruce pieces. This really helps contain the horse manure for weed seed reasons, and helps keep moisture in the bed too.

I'm winging it with these circular beds made from stacked vertical pieces. They wind up being very steep sided, which makes it challenging to add the outer skin of soil.  

A second layer of rounds... on bed #3

Here you can see the cardboard and cotton sheets, and my start on covering them with leaves.

I ended up fully covering the sheets with wood chips and leaves hauled from the valley, but later that winter, the deer ate most of the leaves! There is nothing easy about growing plants and managing weeds in this environment, but that makes it all the more rewarding when things do work out.


Two years later:

Orchard grass has taken over around the beds, and I still haven't managed to finish the outer skin of soil. The beds are growing fine, but more like conventional raised beds than hugelkultur rotting wood beds. If I want the wood to break down and provide the benefits of rotting wood, I need to cover the rounds with soil. It takes quite a lot of volume!

Opportunity knocks

My husband is creating a wider level area for his sawmill. In cutting into the bank, he is creating a source of native bunchgrass and beautiful soil. I won't be able to cover all of the beds, but it'll be a good start! 

Loading the ATV with soil and native grass sod

Parked on a hill, letting gravity fill the wheelbarrow


Above is the progression of the bed that has the lilac, being covered with native grass sod.


And this is the bed I haven't gotten to covering with soil. It's functioning a little more like a conventional raised bed, although it does have rotting wood in its core. It now has hops growing on the outside as an experiment in lieu of a soil skin. I'm experimenting with live skins that are less labor intensive, to see how that works. In the center of this bed is Maximilian sunflower, a perennial sunflower that has been doing very well here.

A bonus: 


I started out this project aiming to suppress St. John's Wort and to build a windbreak and privacy barrier. As shared in my last post, "Mycelium Magic", I got a whole lot more out of the project: here you can see morels popping up on the edges of the sheet mulch. All around the edges this spring, was the gift of morels! You may know that open, south-facing, rocky hillsides are not a place where you would usually find morels. However, the layering of manure, cardboard, leaves, and wood chips seemed to work for them. I've been inoculating other sheet mulch areas with morel spores, using newspapers upon which the mushrooms were dried. Here's hoping this is a replicable model!

Although hugel on the rocks has been a huge amount of work, it has been a lot of fun to create a new microclimate in an unlikely location. So far, I have not found a location unsuited for hugelkultur. It seems to work everywhere!