
Here's how it happened:

Using the backhoe, my husband dug this pit down to the bedrock, making it as deep as possible. The idea was to have a full hugelkultur layer with a cold frame on top of it, but also underground.

I'm happy to say that with a bow saw, I can now do a LOT more than I used to. Thank you, Lee! I ♥ good friends who help me see things from a different angle. This was the first load of wood that I cut, just elbow grease and a bow saw, plus my 7 year old daughter sometimes on the other end of the saw, working it the old fashioned way with me. Great memories... She also liked jumping on the logs to try and get that final break to finish each cut. Nature's trampolines!

This is the base layer of random rotting wood from around the property, mostly Ponderosa pine and Douglas fir -- with horse manure on top.

After finishing off the first manure layer, I discovered that a mister is the ideal way to hydrate a hugel bed in progress. It provides just enough moisture for the organic materials to wick it up, but not so much that the water runs off. A mister is a great addition to any garden -- it will cool you off in the summer and provides interesting low-flow, gentle irrigation options!

A second load of wood, also mainly scrounged from around the property with a bow saw. What a great workout, whew! There are also a couple of large diameter spruce pieces from Lee's property. (Thanks!)

More horse manure, gotta love how *hot* it is, for these base layers especially.

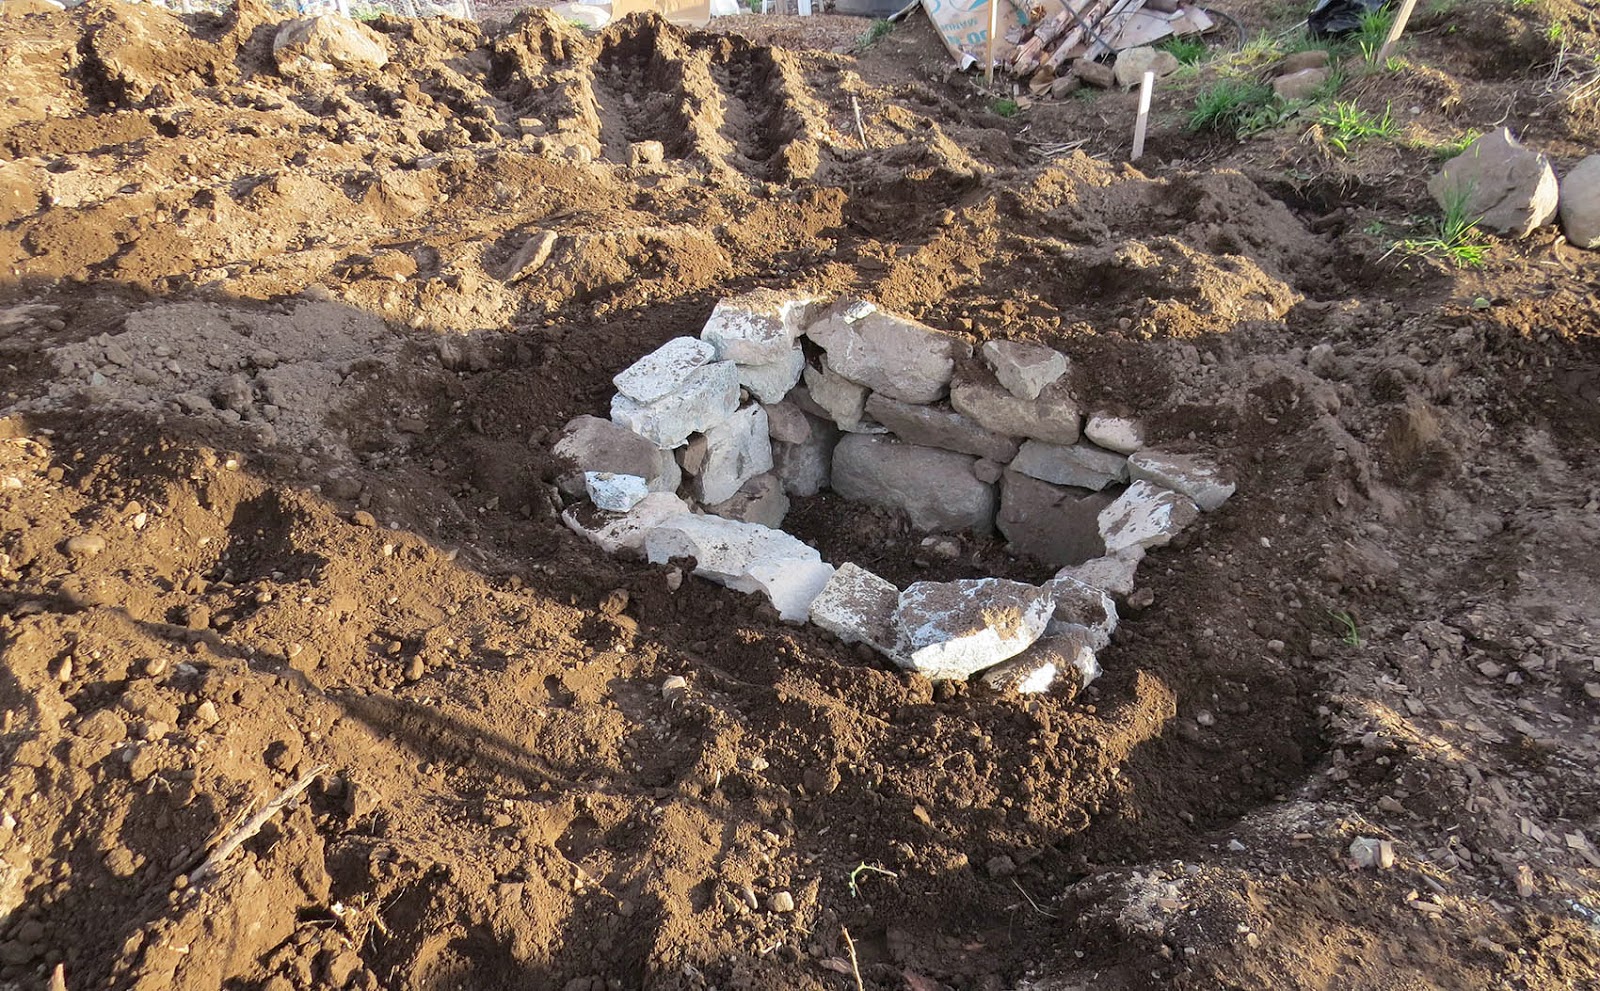
At the half-way mark in filling this pit: a helping hand in creating a soil layer

Part two begins, with a solid layer of hugel below the soil.

Enter rocks for the underground cold frame!

A few rocks at a time… building muscles in the universal gym of the great outdoors.

Just trying it out -- this is the concept I'm after! Thanks, Dad, for the window. :-) Yes, I brought it all the way from Vernon, BC (they didn't mind at the border). He even drilled holes in the aluminum frame for me, and provided me with hinges -- wow! I ♥ my Dad.

I added some hay found on the side of the road by a neighbor (when you are burying the hay this deep, you don't have to worry about weed seed). Man, I love living where we do -- what a great community. Our neighbor showed up with a trailer full of hay after his family hay rides were over. Sweet! Thanks, Ron.

Dry fitting rocks is a lot more difficult that I realized, but fun in a puzzle sort of way. I still can't believe I moved that front rock -- but sometimes bigger is better and it was definitely worth the effort.

With the main part of the cold frame set in place, I was ready to layer in hugelkultur materials around it. First horse manure...

…then wood. This time my husband, Bob, bucked up a bunch of rotting wood into roughly 3-4 foot lengths, mainly pine that was laying around ever since the fire on the property around 10 years ago. I added in some alder from Lee along with some other longer pieces I had laying around, and managed to add another full layer. My mantra is generally, "Use what you have available!"
Note: Sometimes it makes sense to put the wood in horizontally because you have smaller diameter wood readily available, and also there may be time constraints in bucking it all up into short lengths that can stand on end. When possible, I like to put the wood in vertically to provide plant roots the opportunity to utilize the direction of the vascular tissues in the wood for accessing moisture. That way, the tubular structures of the xylem and phloem that run lengthwise through the trees may provide easier access to water as roots grow down into those structures. The xylem and phloem are opened into cross sections when the logs are cut to length (like straws within the logs). However, with very rotten wood, all of those structures eventually break down, and then the orientation of the wood placement won't really matter. Most of this wood has been in the process of decaying for a long time, so I'm not too worried about the orientation.

Yet more horse manure -- I really want this bed to cook, and help heat the cold frame!

The final step was to spread soil over the hugelkultur and around the underground cold frame.

Bob pulled in soil that was piled in the surrounding area, from when we dug this pit. Unlike other areas of the garden, this spot actually produced a lot of soil instead of mainly rocks -- jackpot!

Full circle! The soil that came from the pit is returned to the bed.
I smoothed the soil with a shovel, piling it closely in around the rocks. Now the cold frame is actually underground, as intended.

Next will come the finish work in turning this structure into a functional cold frame. But that will be for another post. It was a long process getting the bed to this stage, and I'm excited to see what will grow in this sunken rock space, not to mention also around it on the surface!
Wow, what a great project! I'm excited to see how this works for you. I've thought of using a steep bank in a similar fashion to build a large coldframe/small greenhouse, and this gives me more ideas on how that should look. Thanks, Julie!
ReplyDeleteThank you, Jacki! It has been a lot of fun to do this and I'm excited to see how it goes, too. It's great having others to share this enthusiasm with. Since the space is pretty deep, I'm planning to layer more fresh manure in the bottom for heat, and then soil on top. Good luck with your steep bank project -- let me know how it works out!
ReplyDeleteHi Julie, this is JD from Permies.com Wow! How deep is the base of the hugelbed? looking forward to watch the results.
ReplyDeleteHello JD, and welcome to my blog! Thanks for checking it out. The base of my beds average 5 feet deep and extend across the majority of the garden. The underground cold frame bed was 5-6 feet deep depending on where I stood in the pit. I have found that the growing space has been lower down than I need it to be so I will probably build it up a little with more manure for additional heat. The swiss chard stayed alive in it all winter long! We had some really cold snaps at the end of 2014 so that was exciting to see. Now I just have to keep the mice out. ;-)
Delete