Follow "Wood for Food" Blog by Email

Want to stay posted? If you'd like to receive an email when a new post is added to the Wood for Food blog, just type your address in the above field, and click "Submit."

Thursday, July 2, 2015

Alderwood Archeology

The Alderwood Patch has come a long way from its days as a garbage pit, the way we found it when we bought the property.

Not only has the garbage been removed in a dump truck, and hugelkultur built up underground, but this year, a favorite childhood plant of mine has volunteered, bringing a sure sign of a microclimate shift! Scouring rush (Equisetum hyemale), a wetland indicator plant that sometimes grows outside of wetlands, popped up in the Alderwood Patch this spring, like a miracle in dusty sagebrush/Ponderosa Pine country. So how are things going underground, helping to alter the balances of moisture and temperature?

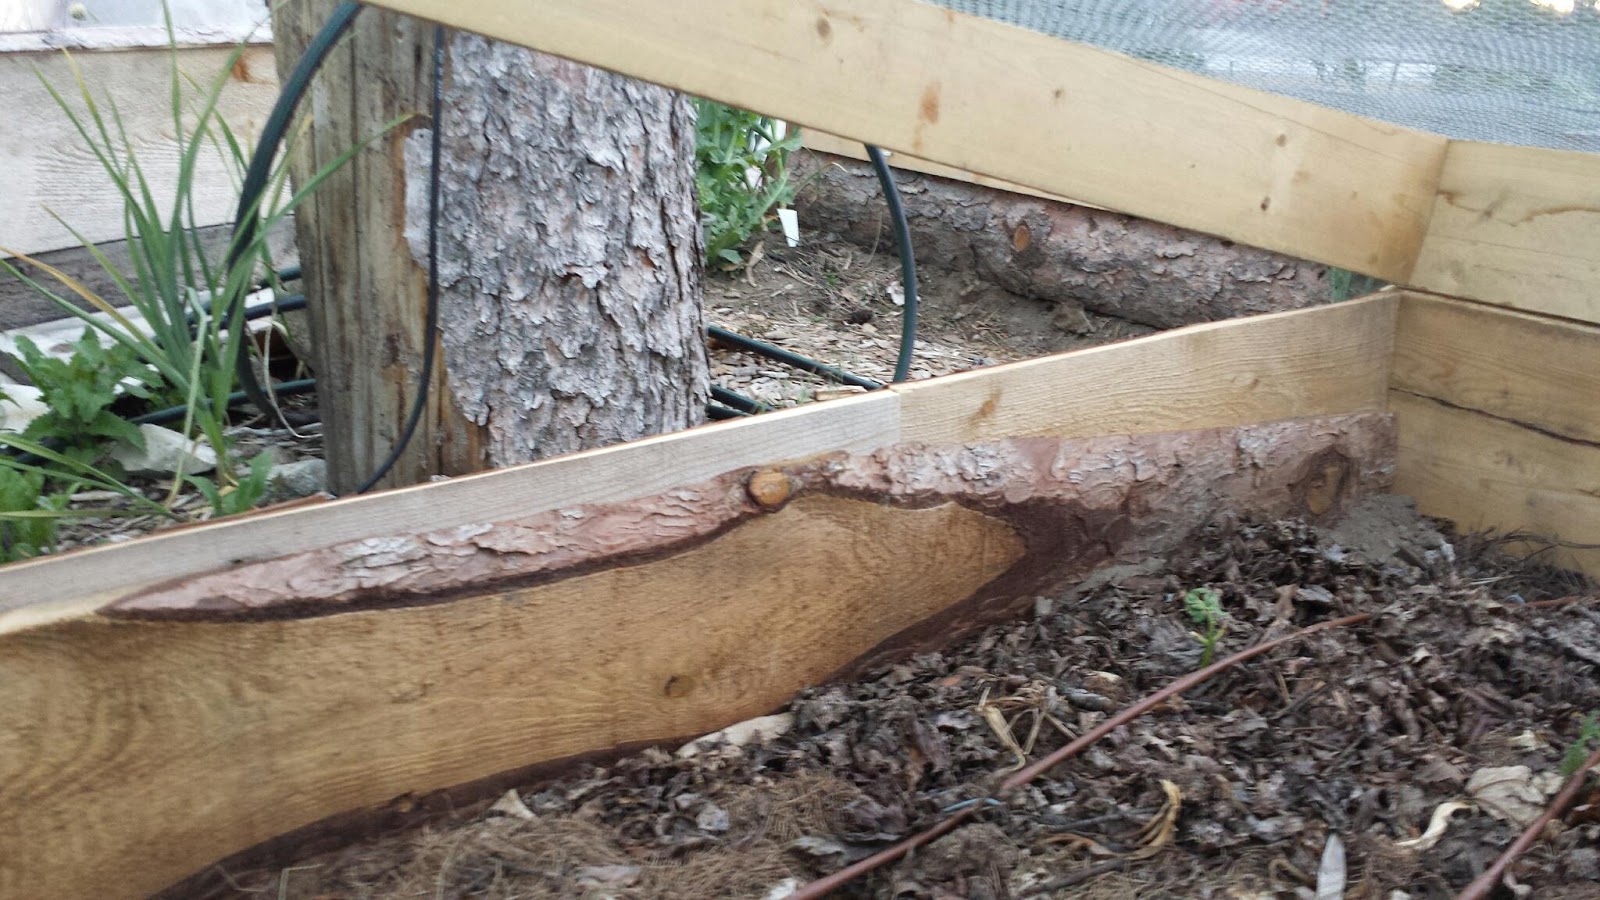
In March, I decided to rebuild the raspberry trellises as they were not tall enough. I made the circle bigger and as a side benefit, began some hugel-archeology with the post hole digger.

When I hit wood, at first I thought that was as far as I could dig. Then I decided to use the breaker bar (spud bar) to see if the wood had decomposed enough to dig through.

Indeed, I was able to put the post hole right through the hugel wood.

This is the condition of the alder wood in March 2015, after being in the ground since August 2013 (one and a half years). 


3/22/2015
The Alderwood Patch with its new trellis posts

A couple months later...

5/25/2015


The raspberry blossoms attracted a wide variety of pollinators this spring. 
This might be a Cuckoo bee from the genus Nomada.

The raspberries have been alive with many kinds of bees.

My favorite: the bumblebees!


Fawn says that even the green leaves smell like raspberries.

At last they start to ripen...

...and how fitting that the wildlife got the first one! 
It seems there may be enough to go around this year, though. :-)

Wednesday, June 17, 2015

Frames for Food

As the yellow-bellied marmots seek more and more food, 
I build more and more cages. 
All shapes and sizes ~ this time of year is a framing free-for-all!

This is the first above-ground frame to grace my garden, and it is featured in the Vegetable Jail post. Lee Johnson helped me build it using old 2x6's from behind our shop. A woman from Omak was giving away old leather belts, so I tried using one for a latch on each corner to keep it shut. It is a good concept, but the old leather was already brittle and they have started ripping. It would be good to have thicker, more supple leather.

Here Fawn is harvesting from this same frame. It was planted on Valentine's Day and has been serving us well! Just a few old 2x6's can protect enough lettuce to keep our family eating salads every day. 

This design is tops for simplicity: 
1. Nail some 2x6's into a rectangle. 
2. Make a lid frame to match, using 1x2's or 2x2's, or 2x4's. 
3. Tack on hardware cloth or chicken wire. 
4. Done. 
(Hinges, latches, and plastic or fabric are optional)


This I call, "Bill's garden bed." My husband's lifelong friend, Bill, was helping me add aged manure to this bed on the day he died at our home unexpectedly, earlier this spring. He also helped me try to remove a piece of rebar that I had pounded in (last year, to support a different marmot cage that came before I learned to frame with wood). I will always remember working this soil with Bill, and the gezellig of working together that day. I will honor his memory by sharing my produce with others in the way that he was generous with us.

This is Bill's garden bed with the lids on, and after the plants have had a chance to grow.

This is how the angled lids open. I love hinges!

This large frame was featured in the Vegetable Jail post. 
I have started adding extensions as the plants get taller.

Here's how it looks from the other side. Since this photo was taken, the carrots and onions have topped out of the extension too!

This design is tops for its ability to grow taller plants...

...and the curved roof for shedding rains when plastic is laid on top. 
It is more like a mini-greenhouse than any of the other designs.

Here Fawn is picking Red Orach, a wonderfully purple salad fixing! The front panel is compression fit into the frame, and the lid lifts off.

When I can't get my hands on wide or straight enough boards, then I cobble together miscellaneous pieces to create the dimensions I need. This is my green bean bed. One side is made from two pieces of slabwood.

The other side is made from several different pieces, all nailed together to generate the needed height and length.

It turned out better than I expected, given the mish-mash of pieces. I love making "something from nothing," a concept we practiced at B.X. Elementary school in our "Extra Enrichment" classes with Mrs. Barling. It means you take things that would normally be discarded as useless, and make something that you are proud of.

Deb visited my garden today and took this photo. It's fun to have garden visitors! 
(Thanks for taking this photo, Deb.)

The next frames on the docket are for the strawberry beds to keep the chipmunks off. The bonus with all of these cages is that they also function as cold frames, and will extend the growing season in both directions. So, I don't mind making the effort and learning some new skills in the process. We are definitely eating more veggies as a result.

Tuesday, June 2, 2015

Cucumber Tipi - Part 2

In the Cucumber Tipi Part 1 post, you saw a patch of weedy orchard grass turned into a central structure in the Wood for Food garden. We now have a tipi for growing veggies vertically out of the first underground aspen hugelkultur bed.

Just for fun, this photo shows me standing in 2012 about where the tipi is now! The tipi would be on my shoulders, though. (The fence post in the above picture is the same post you see in the picture below, taken from a different direction.)

With the tipi erected, it needed something for the plants to hold onto. I love using old materials instead of buying new things that require resources to be extracted from the earth. I contacted the owners of a local gem, the Esther Bricques Winery, to find out how they source their trellis wire. They happened to have some wire that was ready to be re-purposed, and I experienced again the main lesson this garden has taught me: envision having what's needed, knowing that it will surface, and it will. Thank you so much, Linda and Steve Colvin, for helping make this project happen!

Around and around and around I went with the wire. It started raining but I was determined to finish. Here the circular trellis wire is attached, looking up from inside the tipi. This is a much heavier gauge wire than I've worked with before, and I really like the structural integrity that it added to the tipi.

The wire is attached with small fencing staples. 
I left a gap between two of the poles for the door. 

And now, we have cucumber sprouts! 
We can't wait to see the plants grow, sit in the shade of their leaves, 
and taste the crisp, sweet goodness of an Armenian cucumber straight off the vine.

*          *          *

Meanwhile, back in the "early sowing outdoors" beds, things are coming right along! This is our first time eating carrots from the garden at the beginning of June.

 Fresh carrots straight out of the soil taste like, "life is good."

Tuesday, May 26, 2015

Early Sowing Outdoors

This year, I experimented with growing veggies by sowing seeds directly in the soil much earlier than suggested, with additional protection from the elements. In years past, this is what my windowsills have looked like (this many starts at once):


I enjoyed raising all those starts at the time, but there were several constraints, including regular watering, space required, hardening off, and the time needed for transplanting. This year, I only did a few starts in the house, bought some onion sets, and the rest of the plants were directly seeded in the ground. In the past, I thought I needed a greenhouse to do this. At last I realized that the first month of growth only requires a hands' width of headspace, and I built frames 5-10" tall to create a cozy growing environment.

These Red Zeppelin onions were planted on April 7th as sets with live tops, ordered from a nursery. I planted them outdoors in the conventional way, without any protection from the cold, other than a thick layer of mulch (larch needles), or in this case the outside wall of a nearby cold frame. They were sets with green tops a few inches tall when they arrived.  As you can see in the photo, they are around 8" tall now, and some are smaller.

These red globe onions were sown from seed on March 5th -- a month earlier -- inside the large frame pictured in the vegetable jail / season extension post. Prior to planting, the soil had been pre-warmed with overlapping black plastic bags laid flat. They were planted with carrots as companions. These onions now have long tops, more than 18" tall.

The plants sown directly in the ground from seed had only one month head start on the mature sets, but they have definitely surpassed the sets in both height and vigor.


This honeyboat squash plant was started in the house from seed (I only did one this year). It looked very healthy in the windowsill and I hardened it off gradually, giving it more time outdoors each day. I transplanted it into the ground last week. The one gallon pot is included in the photo for scale. 

This honeyboat squash plant grew from seed sown directly in the ground when it was still quite cold out in early spring. As soon as the soil thawed, I put a seed in the ground and placed a glass bowl over it, upside down. This plant has much higher turgor pressure, making the leaves stand out erect and strong, as compared with the start from indoors, which is still limp and in a state of shock from the transplanting. This squash plant is growing in the aspen hotbed, the warmest soil in the garden with lots of rotting wood and manure. That is also where I transplanted the start from indoors.

Overall, I've seen several benefits from direct seed sowing with protection, instead of raising starts indoors. Not only does this method address all of the constraints listed above, but it also avoids transplant shock and produces vigorous plants that are already adapted to the outdoors. In addition, the frames help harness some of the heat that is likely being emitted from the underground hugelkultur. Without a frame to capture the heat as it rises, a lot of that heat is simply lost. The frames also capture solar heat. I am definitely going to repeat this experiment next year and see if the results continue to guide me toward direct seed sowing. 

An additional benefit is that the frames keep the marmots off my plants. They have mowed the greens outside of the frames, but what's protected actually ends up on our table. And that's the main idea of this whole exercise!

Sunday, May 10, 2015

Cucumber Tipi - Part 1


The center bed in my garden was taken over by orchard grass. I pulled the grass out a couple of years ago and fed it to the underground vertical spruce hugelkultur pit, but it all came back. This year I decided to layer the orchard grass bed heavily with alpaca manure and cover it with cardboard for weed suppression.

The manure from Mowry Mountain Alpacas is fabulous stuff. 
Aged, it looks like rich soil and has a somewhat sandy texture.

You could not imagine a better soil amendment!

Here is the center bed with a ring of alpaca manure where I planned to plant Armenian cucumbers.

Side-by-side comparison of alpaca manure and native soil. Need I say more?

This is the bed covered with overlapping cardboard and a layer of larch needles and leaves (pulled off my asparagus beds from last fall).


Time to put the tipi up! These are larch poles from Wauconda, thanks to a fun work day with Lee Johnson, clearing leaners from his road. First the tripod, then the clove hitch knot (first an X and then an H)...


...then the remainder of the poles plus a few wraps with the rope.

The brown tubing is a 1/4" line with drip emitters built into it.

To plant through the cardboard, my left-handed weeding tool works great for creating a hole.

Since the cardboard hadn't settled onto the ground surface yet, there was some airspace below the cardboard. I punched a bottomless jug through the hole, and poured soil and water into it like a funnel. This may seem a little tedious, but picture not having to do any weeding throughout the whole growing season! It's worth the effort up-front.

Here is a hole after soil was added and tamped down, strategically placed just below the emitter.


And a cucumber seed placed in a hole, before being covered up 
-- we can't wait for these to grow!

My next task is to wrap wire around the tipi poles to create the trellis surface, and then staple clear plastic around the outside to turn it into a greenhouse. I'll leave the plastic up until the weather warms more and the plants are large and prickly enough to be unappealing to marmots. This tipi should provide a helpful combination of vertical growing space, greenhouse conditions, and protection from wildlife. It will also provide a shady place for Fawn and I to seek shelter from the blazing sun later this summer. Stacking functions!