Follow "Wood for Food" Blog by Email

Want to stay posted? If you'd like to receive an email when a new post is added to the Wood for Food blog, just type your address in the above field, and click "Submit."

Saturday, April 9, 2016

Potato Tower


A few years ago, my daughter planted one innocent looking little raspberry plant -- given to us by our neighbor's mother -- which she named, "Trixie." Oh, were we ever in for some tricks. Trixie grew into many raspberry plants, which are now attempting to take over half of the garden. Above you can see Fawn with Trixie and her descendants, last summer. The raspberries also extend about 12 feet to the left, outside of the picture.

I knew that this year I needed to take some action. I trimmed Trixie way back, and then plastered cardboard down over the canes in one of the areas never intended for raspberries. Around the cardboard I built a simple 4x5 foot frame. This will be my first attempt at growing potatoes vertically. 

Note that it is really important for the first frame to be level. Also, since I'm a firm believer in crop rotation, next year I will use this frame to extend the growing season and to protect carrots from marmots. But for this year: potatoes...

I filled the bottom of the frame with sand, for drainage.


Next, I crammed and tamped native soil along the inside perimeter, to discourage mice from getting interested in sneaking in.

A thin layer of partly decomposed leaves, maybe three inches deep...

more sand...

several wheelbarrows of well composed manure...

seed potatoes and more sand, soil, and compost.

After planting, I built another layer of the frame. I will put a little more soil on top, since the seed potatoes are quite near the surface. Then, as the potatoes grow, I will add more soil, sand, compost, as well as pine needles as mulch. As the potatoes grow upward, more layers will be added to the frame. I am using slab wood from my husband's mill, since the outside pieces of the logs, being rounded and covered in bark, are not functional for very many other projects. It's a little bit like our "Extra Enrichment" classes in elementary school with Mrs. Bev Barling: "Making something out of nothing." Sawyers often just burn or chip these pieces.


Instructions I have found online call for screwing each layer of the frames in place, then unscrewing at harvest time. I know myself during the harvest season, and I'm going to want to quickly pull this potato tower apart when the time comes, with no tools needed. So I am experimenting with some pivot latches -- one screw in one slim board, which can be pivoted to hold or release the board above it. Just like the barn door when I was a kid, only sideways.   :-)


What you grow matters...
A key piece of information to know if you are considering growing potatoes in a tower: not all potato varieties grow alike. Short season potatoes mature sooner and may not put out tubers from the stems. So it doesn't make sense to grow these varieties vertically, because vertical is not going to happen! Instead, choose mid or late season varieties, which will continue adding tubers to their stems as long as you add frames and soil in a timely fashion. A quick internet search will inform you as to what varieties are early, mid, and late. Although you may come across some conflicting information, certain varieties are often listed as late season, such a most russets, German butterball, fingerlings, purple majesty, etc. Many yellows and reds are listed as early season varieties, which you should grow in a more conventional way. A rule of thumb seems to be that an expected maturation of at least 90 to 130 days means that the variety will continue to set potatoes further up the stem, making it worthwhile to grow in a tower.

Planting prep:
I exposed my seed potatoes to warmth and a moderate amount of light for a couple of weeks prior to planting, to let them pre-sprout while I prepared the tower. I let the cut potatoes dry out and heal a little for a couple of days, and then planted them. You can sprinkle some fir bark dust on the seed pieces if you think the soil is going to be overly wet. In our climate, this doesn't tend to be an issue.


Looking forward to another growing season!


Monday, April 4, 2016

Mixed Bed Construction

Looking back on the construction of my subterranean hotbeds, this is one that hasn't been covered on the blog yet.

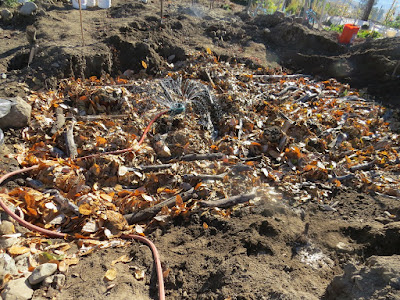
I decided to make one bed with a diverse mix of species -- spruce, alder, aspen, whatever I could find. Depending on the piece, it was laid either vertically or horizontally, making it a truly "mixed" bed.


"Before"
This bed was built during the second year of hugel-construction in the garden. The green areas on the right are one-year-old rotting wood beds, growing prolifically. The bare soil at left-center includes the place where the mixed bed went in.


"Before"
The soil was so dense before building the subterranean beds, that it felt like walking on a high traffic hiking trail. Our farmer friend Bill remarked on the sensation underfoot, saying that it felt like hard pan, with no give. Now it is fluffy with earth worm castings and plenty of aeration as the wood settles and breaks down.


I put manure on the top of every exposed vertical end, to provide nitrogen at those important interfaces. The logs were surrounded by horse manure, with longer pieces in layers with the manure.

Next, I added lots more wood, filling some of the gaps with large and small pieces.


Another load of horse manure helped turn this into a hotbed. Thorough watering after every layer helps trap moisture inside the bed. This is the one and only chance to directly water these surfaces, so it's important not to take shortcuts in applying water during construction.


And leaves! Lots and lots of leaves...


A little soil, more leaves, and more water.

As I built up closer to the surface, I added smaller diameter wood in a bed of leaves. The experiment here is to see how it works planting into the smaller diameter wood as compared with the large pieces. Also, being smaller, they have greater surface area and will break down quicker -- similar to the smaller food pieces in your compost pile. 


More water

Another layer of horse manure on top of the small wood and leaves, providing nitrogen and warmth.

More leaves, more small wood...

...and a final skin of soil across the top.

This close up of one of the vertical pieces helps you to visualize how accessible the wood tissues would be for roots to penetrate, as compared with the side of a log. This is the rationale behind placing pieces vertically. However, that said, my horizontal beds are performing just as well in general, so the orientation has not proven critical in the Wood for Food garden. The amount of manure and rotting straw seems to be a more important factor (the more the merrier).


"After"

Sunday, April 3, 2016

Who is Hardy? Perennial Garlic

Garlic is well known for being hardy. When fall-planted, it begins to grow and then has no problem going dormant through the winter, ready to be first up in the garden. Unfazed by spring snows, you cannot beat the hardiness of this plant. Or can you?


Quite accidentally, I learned a few years ago that garlic is even more hardy if you allow it to grow as a perennial. Wow! It will not only be the first sign of life in the spring, but it will become lush, thick, and tall before the radishes have sprouted -- or even been planted.


You can use the garlic greens like a "cut and come again" option for salads, baked potatoes, and anything else you like to eat with the lively taste of fresh garlic. It's a wonderful garnish for just about any meal. It's got to be incredibly good for you, too, with its rich green color and its bioactive components, especially when eaten raw.

Then, throughout the season, you can tug on one of the plants that make up a clump, and enjoy fresh cloves also. Just leave some in the ground and you will always have garlic... no planting required.


If perennial garlic was not "a thing" in my garden before, it is now!

Tuesday, March 15, 2016

Who is Hardy? Green Orach


The past two mornings, it has been -4 C, or 25 F. I wondered if I would find all the tender green orach sprouts keeled over, but no! In fact, they looked as vibrant as ever. At first I saw the clumps of volunteer sprouts, and thought that maybe they had protected each other from the cold, like individual moss plants growing together in thick cushions for insulation in cold or dry climates. 


However, when I saw these individual sprouts doing fine, I knew there was more to it than density. I thought perhaps the pine needle and leaf mulch had made the difference here.


When I found sprouts growing out of bare soil, supple and alive as ever, I concluded that this must be one hardy plant. It isn't just surviving a solid freeze that makes green orach hardy. This plant seems to be much less picky about soil warmth for seed germination, too. In early March at 3,000' elevation in North Central Washington, green orach has come to life throughout my garden, both in cold frames and out in the open -- before the radishes, spinach, lettuce, kohlrabi, carrots, or any other seeds showed signs of life. I don't know to what degree the slow burn of rotting wood is warming the soil, but I do know that it's still too cold for most other seeds to sprout. 

I use orach mainly in salads.
(Green and red pictured in the center of this harvest bowl from last year) 

Don't believe it if people tell you that orach is a "warm-season plant." It is perfectly happy in cold weather. It gets the warm-season reputation, though, because it doesn't bolt nearly as quickly as spinach, and is reluctant to become bitter even in the heat. What's not to love?


I would like to extend a heartfelt and special thank you to Berta, who shared this seed with me. The first time I ever met her was at Lost Lake and she asked, "Do you have a garden?" When I said yes, she replied, "Hold out your hand. Do you have a pocket?" Soon my jacket pocket was filled with green orach seed, and I knew I had met a kindred spirit. :-)

Saturday, March 5, 2016

Spring has Sprouted

At first I wasn't sure what these prolific volunteer sprouts were. Then I found some still emerging from their seeds, and realized that they are green orach, one of my favorite salad greens!

A few days later I found this... Green orach branches laying on the ground have sprouted like mad!

Inside the cambered frame, the red orach has also come to life. I will relish their tender leaves in salads, tacos, etc. The only thing better than green orach is red orach! They are pretty enough to grow for their looks alone, but also delicious and very good for you.


Outside, it was 42 F or 6 C today (left), and there is still snow on north-facing slopes. However, the sun was shining... and inside the tipi greenhouse it was 90 F or 32 C (right), in the shade of a large pot. It was sweltering! This is just a simple tipi, with plastic on the east, south, and west sides, and an old thrift store blanket on the north side. I don't think you could make a more cost effective greenhouse.

The cauliflower has sprouted inside the tipi greenhouse. I surrounded the sprouts with coffee grounds because the slugs are already at epic levels. They are a *special* part of the microclimate we've got going.

Cauliflower-to-be (already being munched, but hanging in there)

This sight is a miracle to me: last year's seed husk with a live plant establishing itself. Wow.

And out on the property, more miracles -- the first buttercups of the year! This is my daughter's hand, for scale. 

Few things bring more joy around here than the first sprouts in the garden, 
and the first buttercups on the hills.


Sunday, February 21, 2016

Late winter garden

Thinking about year-round gardening and winter gardens might conjure up images of kale surrounded by snow, and last year's carrots being dug out from under the mulch in January. These are wonderful components of a year-round garden. Once spring begins to show its face, we turn our attention to planting for the new growing season. But what do you harvest after the winter garden has pretty much been eaten, and the new growing season is in its infancy?

This year I tried fall-planting some seeds that I knew wouldn't mature on time for the dead-of-winter garden. I also left some key plants in the ground during autumn harvest. Of course there are also a few precious perennials that don't mind the cold weather, either. Today I'd like to share how these methods have translated into an active late winter and early spring garden.

Outside of the garden, my composted manure pile is frozen hard as a brick. But here in the aspen hotbed, the soil is supple, and these Egyptian walking onions are hanging in there.


New onion greens are coming up, sprouting from onion bulbs that fell off the top of last year's walking onions. (This is a perennial onion.)

During harvest time last fall, I left a few onions in the ground, which now means green onions in late winter! (This onion variety would normally be viewed as an annual, but I'm growing like a perennial.)

Today I harvested the first radish of 2016, in the tipi greenhouse. Note how sickly the top of the radish looks, and yet underneath the soil was a beautiful salad-ready radish. I planted this seed last fall, and it sprouted and grew just a little before winter hit. Little did I know that it has been steadily growing, perhaps as the days have started to get a little longer and milder.

Last autumn, I accidentally sprouted a bunch of onion seeds (they got wet), so I laid them in the soil in the tipi greenhouse. Now they are coming to life! Soon I will be cutting green onions from their tops. It's an accident worth repeating.


I had no idea that this purple kohlrabi was hanging in there, in a cold frame that my Dad made for me, using a window from a workshop upgrade. This winter garden produce was missed during the core of winter -- and therefore is available for spring, when I've only just put kohlrabi seeds in the soil. I think I'll let it grow a bit bigger.

This is a third generation garlic plant -- each year, I keep leaving it in the soil, and it provides me with lots of garlic greens as one of the year's first salad offerings.

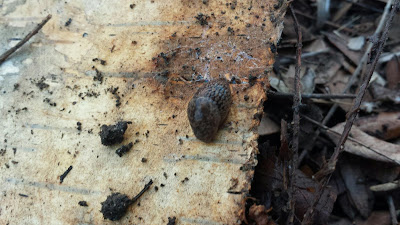
And now for the dark side of our microclimate: it isn't all peaches. Warmer soil means that we ALREADY have lots of slugs, pill bugs, and who knows what other competition for our goods. However, I'm working on making room in my heart for pill bugs, since they mainly like to eat dead and decaying matter, similar to earthworms, which will help the garden. I hear that they can also take in heavy metals, so they can do some serious good. (They also like tender young shoots... I will plant twice as many bean seeds as I actually need, and hopefully there will be enough seedlings left after the pill bugs are through.)  Slugs however, seem to take more than they give. I'm working on appreciating the fact that they serve as food for some of the birds that enjoy the garden. 

All in all, cultivating a milder, more moist microclimate is worth it to me.